Setup S3 Deployment & CloudFront Invalidation with Travis CI.
February 12, 2019
Motivation
It has been more than 5 months since I created my portfolio. My website is deployed using AWS S3 & CloudFront. But whenever I update anything on my site, I have to manually put the files into S3 bucket and run CloudFront invalidations.
This tutorial will walk you through step by step process to set up Travis CI so that with one git push you can update your S3 bucket as well invalidate your CloudFront distributions.
Steps
- Go the travis. Sign-up using your github account. Now, navigate to Dashboard and you will see I have one repository that has already been added to Travis CI console. (In your case there will be no repositories) .
If you need more assistance, please click here.
- Go to Settings by clicking on the top right profile icon.
- Navigate to Manage repositories on GitHub .Then, select the repositories you want to include in your project. As soon as you select the repository from GitHub, you are navigated back to settings page.
Follow the images for the aforementioned process.
Selected repository appears here (daksh-blog in my case.)
- Now, navigate to Dashboard. Your selected repository will reflect here. You are also provided with an option to trigger the build, but before doing that, lets configure .travis.yml file.
- Go to your project directory. Create .travis.yml file and add the configurations as provided below.
# For Gatsby app.
language: node_js #You need node js enviorment to build your app (Gatsby in my case)
node_js:
  - "8" # Version 8
cache:
  yarn: true # Cache "node_modules" for once.
  directories:
    - node_modules
before_deploy:
  - yarn run build # commands you will use to build the app,
  # You can add more commands if you want.
deploy:
  provider: s3
  access_key_id: $AWS_ACCESS_KEY_ID # your AWS credentials.
  secret_access_key: $AWS_SECRET_ACCESS_KEY
  bucket: $S3_BUCKET # your s3 bucket
  skip_cleanup: true
  local_dir: public # directory which has to be pushed to S3.
  on: # optional: defaults to 'master'
    branch: release branch # select your branch accordingly.
In the above config file my build folder is public and my branch is release. In your case, they might differ.
- Focus your attention on $AWS_ACCESS_KEY_ID, $AWS_SECRET_ACCESS_KEY and $S3_BUCKET. You will be adding these configurations directly in your Travis CI environment.
- Commit the .travis.yml file, and push it. Now, navigate to dashboard. As you will see that by pushing the file, you triggered the build process.
- Now, open the repo from your dashboard. Your page is divided into two main sections. The left tabbed section shows the repositories and running build processes, while the right section gives more info about currently selected build.
As the push was done to master branch, the build process is being spawned from that branch only.
This build is likely to fail because in my case, I mentioned my source branch to be release branch, NOT THE MASTER BRANCH.
- (optional) Create a new branch release, and then push the branch. This will trigger another build process in your Travis CI console.
You will feel that everything will work perfectly now. BUT YOU HAVE FORGOTTEN ONE MOST IMPORTANT THING - YOUR ENIVORNMENT VARIABLES 😉.
Go to AWS.
- Open your AWS console using your root password. Navigate to IAM service for creating a seperate user for obtaining $AWS_ACCESS_KEY_ID, $AWS_SECRET_ACCESS_KEY .
Below are the screenshots provided. (I have hidden some important details 😉.)
Download .csv right now. You will get this option only once.
- Also, go to S3, and copy your S3 bucket name for $S3_BUCKET. Update your bucket permisson as well.
{
  "Version": "2012-10-17",
  "Statement": [
    {
      "Sid": "AddPerm",
      "Effect": "Allow",
      "Principal": "*",
      "Action": "s3:GetObject",
      "Resource": "arn:aws:s3:::<your_bucket_name>/*"
    }
  ]
}
By now you have ALL 3 enviormment variables - $AWS_ACCESS_KEY_ID, $AWS_SECRET_ACCESS_KEY and $S3_BUCKET
- Navigate back to your Travis CI settings and fill in your enviorment variables.
- Now, push some changes to your release branch. This time the triggered build will be a success and a message “Done. Your build exited with 0” will appear at the end of your travis build console.
Before push (currently hosted directly from S3 bucket.)
After push. (currently hosted directly from S3 bucket.)
CloudFront
- Till now, you have updated your S3 bucket only. Now, let’s move to CloudFront invalidation.
- Update your .travis.yml file.
# For Gatsby app.
language: node_js #You need node js enviorment to build your app (Gatsby in my case)
node_js:
  - "8" # Version 8
cache: # Cache "node_modules" for once.
  yarn: true
  directories:
    - node_modules
before_deploy:
  - yarn global add travis-ci-cloudfront-invalidation # Add this library for CF invalidation.
  - yarn run build # commands i use to build the app,
  # You can add more commands if you want.
deploy:
  provider: s3
  access_key_id: $AWS_ACCESS_KEY_ID # your AWS credentials.
  secret_access_key: $AWS_SECRET_ACCESS_KEY
  bucket: $S3_BUCKET # name of your s3 bucket
  skip_cleanup: true
  local_dir: public # directory which has to be pushed to S3.
  on:
    branch: release # defaults to 'master' branch, but I will be using branch with the name of release
after_deploy:
  - travis-ci-cloudfront-invalidation -a $AWS_ACCESS_KEY -s $AWS_SECRET_KEY -c $AWS_CLOUDFRONT_DIST_ID -i '/*' -b $TRAVIS_BRANCH -p $TRAVIS_PULL_REQUEST -o 'release'
# AWS_CLOUDFRONT_DIST_ID --> will look it up in AWS console.
# 'release' --> it defaults to master.- Focus your attention on $AWS_CLOUDFRONT_DIST_ID. This has to be added to your Travis CI environment.
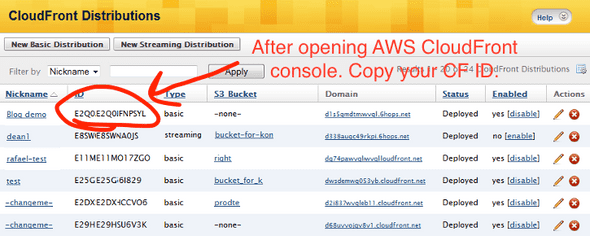
- Go to AWS CloudFront console and fetch the cloudfront_id from the AWS console.
- Copy this cloudfront_id to your Travis CI environment variable.
- YOU ARE ALL SET. Try doing git push on your release branch, and everything should work.
- Thank you.
As a matter of fact, this website has been deployed using the same strategy. 😎
Please let me know if you have any queries.


